

Do you want the beauty and convenience of soft close cabinets in your kitchen? Are you wondering how to install soft close hinges?
This luxury does not require an expensive kitchen renovation or the purchase of custom cabinetry.
You may upgrade your kitchen experience by installing high-quality soft close hinges on your existing cabinets in only a weekend.
We’ll lead you through every step of this DIY project, from choosing the correct soft close hinges to the step-by-step installation process, in this detailed guide.
Understanding Soft Close Hinges
Soft close hinges are equipped with hydraulic dampers that prevent cabinet doors from slamming shut.
Instead, they gently and silently glide into a closed position, adding a touch of sophistication to your kitchen.
These hinges are sometimes referred to as self-closing hinges, and their mechanism is discreetly tucked away within the hinge itself.
Can You Add Soft Close Hinges to Existing Cabinets?
Absolutely! You can convert any existing hinge into a soft close hinge, and the process is simpler than you might imagine.
In the following sections, we’ll guide you through the process, ensuring that you can effortlessly upgrade your kitchen.
The Cost of Upgrading to Soft Close Hinges
Before diving into the installation process, it’s important to understand the cost involved. Fortunately, this project won’t break the bank.
The actual cost of soft close hinges can vary based on the hardware you choose.
On average, you can expect to spend between $3.30 and $6.70 per hinge, with potential cost savings when purchasing in larger quantities.
Choosing the Right Soft Close Hinge in Three Simple Steps
Selecting the appropriate hinge is crucial to the success of your soft close upgrade. Let’s break down the selection process into three key steps:
Step 1: Identify Your Cabinet Style
The first step is to determine whether you have face frame or frameless cabinets. Most standard cabinets in the US feature the face frame style, characterized by a wooden frame attached to the front of the cabinet.
Blum CLIP top BLUMOTION Soft Close Hinges, 110 degree, Self Closing, FACEFRAME with Mounting Plates, and hinge cover plates (1/2 to 3/4” Overlay – Premium – 8 Pack)
- 8 Pack (4 pairs) for 1/2″ to 3/4″ overlay doors
- 3 Dimensional (6-way) adjustment
- Includes: mounting plates and screws
- Blumotion can be deactivated with switc
In this style, the door hinges are fastened to this frame. Frameless cabinets, on the other hand, have hinges that are directly fastened to the walls of the cabinet box.
Both cabinet styles can accommodate hidden hinges, which cannot be seen when the cabinet doors are closed.

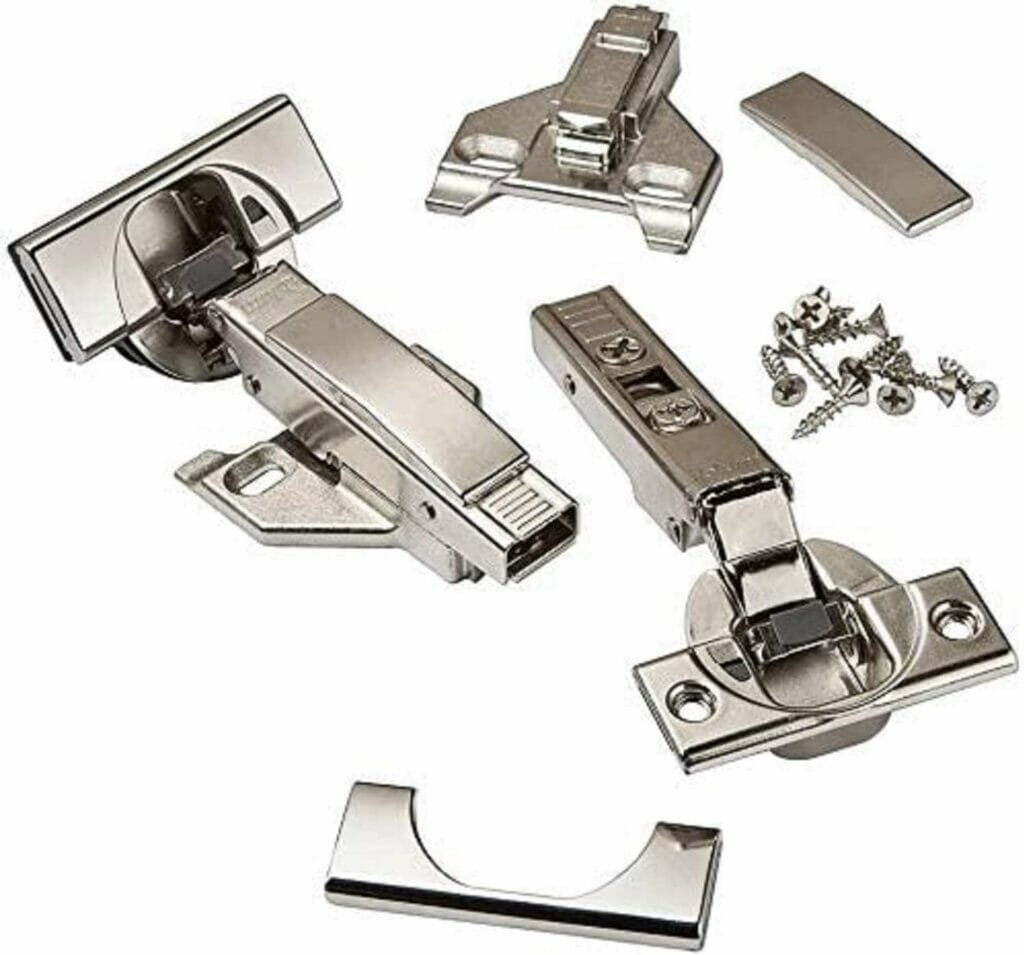
Blum CLIP top BLUMOTION Soft Close Hinges, 110 degree, Self Closing, Frameless, with Mounting Plates and hinge cover plates (Full overlay Premium – 8 Pack)
- 8 Pack (4 pairs) for full-overlay doors
- Blumotion soft-close built-in
- Includes: Hinges,mounting plates & screws
- 3 Dimensional (6-way) adjustment
If you have exposed hinges and prefer the hidden style, it is possible to convert to hidden hinges, though this requires a few extra steps.
Step 2: Determine the Style of Your Cabinet Doors
Next, you’ll need to identify the style of your cabinet doors. Determine whether your cabinet doors are Standard, Full Overlay, or Inset. Each style necessitates a unique soft close hinge design.
Step 3: Choose a Soft Close Hinge Style
With your cabinet style and door type identified, it’s time to select the specific soft close hinge style.
You have two main options: Long Arm Hinges (the premium choice) and Compact Hinges (the budget-friendly alternative).
Option #1: Long Arm Hinges (Premium Option)
Long arm hinges, also known as Euro or European style hinges, are known for their strength and durability.
They feature a robust hydraulic soft close mechanism that excels in high-quality cabinetry.
While they are more expensive than compact hinges, their only downside is their larger physical size, which may slightly reduce cabinet space.
Among long arm hinges, Blum Hinges, particularly their BLUMOTION soft close hinges, stand out as top performers.
BLUMOTION’s hydraulic soft close mechanism is exceptionally smooth and reliable, making it a worthwhile investment.
Option #2: Compact Hinges (Budget Option)
Compact hinges are smaller, simpler, and more affordable than their long arm counterparts. While they work well, they may not be as robust.
These hinges have a smaller hydraulic mechanism that fits inside the hinge itself.

Blum 38N355BE08x10S Compact Soft-Close 1/2” Overlay Blumotion Hinge, Nickel Finish (Pack of 10)
- Screw On Designed for Face Frame Application
- Nickel finish
- Includes 8 hinges
- Screws included
While they offer a cost-effective solution, they have a slower recovery time, meaning the soft close function may not engage properly if the door is closed too quickly after opening.
The Blum BLUMOTION compact hinges are a solid budget-friendly option, offering an upgrade from standard non-soft-close hinges.
However, they are not as versatile in handling quick door closures.
Read more:
- Step-by-Step Guide: How to Install Soft Close Hinges and Transform Your Kitchen
- How to Stop Baseboard Heater from Making Noise
- How to Insulate Sump Pump Discharge Pipe: Keeping Your Basement Dry
How to Install Soft Close Hinges on Existing Cabinets
Now that you’ve chosen the right soft close hinges, it’s time to embark on the installation process.
While some projects are best left to professionals, installing soft close cabinet hinges is well-suited for DIYers with basic tools. Here’s a step-by-step guide to get you started:
Step 1: Remove Old Cabinet Doors & Hinges
Start by removing the cabinet door from the cabinet. Most cabinets use small wood screws to fasten the old hinges to the cabinet, typically requiring a #2 Phillips bit or a screwdriver for removal.
Once the cabinet door is detached, take off the old hinges from the cabinet doors.
Step 2: Drill a 35mm Hole
If your old cabinets had hidden hinges, there should already be a 35mm hole for the new hinges.
However, if you’re converting to hidden hinges for the first time, you’ll need to drill new holes using a 35mm adjustable depth Forstner bit.
To determine the correct hole depth, refer to the instructions provided with your hinge, as it may vary depending on the brand.
For example, Blum hinges typically require a minimum hole depth of 11.5mm.
Step 3: Install Hinge Into Cabinet Door
Now that you’ve removed the old hinge and drilled the hole to the appropriate depth, it’s time to install the new soft close cabinet door hinges.
This step is relatively straightforward. The soft close hinge should fit snugly into the hole and can be pressed down by hand or gently tapped with a rubber mallet if needed.
Ensure that the soft close hinge is aligned properly and flush with the top of the cabinet door. Once aligned, fasten it in place using the small wood screws provided with your hinges.
Step 4: Install Clip-On Mounting Plate
The next step involves installing a mounting plate onto the cabinet. This plate is mounted directly to the cabinet’s face frame, making it easier to attach the cabinet door.
To ensure a secure installation, pre-drill the screw holes with a 5/64″ or 3/32″ drill bit to prevent wood from cracking.
Step 5: Clip Hinges Into Mounting Plates
This step is both easy and satisfying. Hold the cabinet door with one hand and one of the soft close hinges with the other.
Slide the hinge into the mounting plate and then push it to clip it into place. If the hinges don’t align perfectly, you may need to loosen the screws on one or both of the mounting plates and make adjustments.
Step 6: Test Your New Soft Close Hinges
Congratulations! You’ve completed the installation. Test your new soft close cabinet doors to ensure they are functioning correctly. Say goodbye to slamming cabinet doors or doors left ajar.
Tips for Successful Installation
Here are some essential tips to ensure a successful soft close hinge installation:
- Choose the correct hinge style that matches your cabinet and door type.
- Invest in high-quality hinges for optimal performance and longevity.
- Use personal protective equipment and practice safe working habits when using power tools.
- Utilize precise measurements and the right tools to ensure proper door alignment.
- Be cautious not to over-tighten wood screws to avoid stripped screws.
Guidelines for Achieving Success When Installing Soft Close Hinges
- Gather the necessary tools and materials:
- Soft close hinges and mounting plates
- Screwdriver or cordless drill
- Measuring tape
- Pencil
- Level
- Safety glasses
- Masking tape (optional)
- Read the manufacturer’s instructions: Before starting the installation, carefully read the manufacturer’s instructions that come with the soft close hinges. Different brands and models may have specific requirements.
- Mark the hinge placement: Use a measuring tape and pencil to mark the desired location for the hinges on the cabinet door and the corresponding position on the cabinet frame. Ensure that the marks are level and properly aligned.
- Pre-drill pilot holes: To make installation easier and prevent wood from splitting, pre-drill pilot holes in the locations you marked on the cabinet door and frame.
- Attach the mounting plates: Most soft close hinges come with mounting plates that attach to the cabinet door. Use a screwdriver or cordless drill to secure the mounting plates in the pre-drilled holes on the door.
- Mount the hinges: Attach the soft close hinges to the mounting plates on the cabinet door. Make sure they fit securely and align with the marks you made earlier.
- Adjust the hinges: Soft close hinges often have adjustments for vertical and horizontal positioning. Carefully follow the manufacturer’s instructions to ensure the door sits flush and operates smoothly. Use a level to check alignment.
- Install the door to the cabinet: Secure the other part of the soft close hinge (usually a metal cup) to the corresponding marks on the cabinet frame. Make sure the door aligns properly and opens and closes smoothly.
- Test the soft close feature: Gently open and close the cabinet door to ensure the soft close mechanism is functioning correctly. Make any necessary adjustments to the tension or position of the hinges if needed.
- Fine-tune the alignment: If the door is not closing properly or is misaligned, make small adjustments to the hinge settings until the door operates smoothly and closes without gaps.
- Secure all screws: Once you are satisfied with the alignment and functionality, tighten all the screws on the hinges, mounting plates, and door to ensure everything is securely fastened.
- Repeat the process: If you have multiple cabinet doors to install soft close hinges on, repeat the above steps for each door.
By following these tips and the manufacturer’s instructions, you can successfully install soft close hinges on your cabinet doors, improving their functionality and reducing the noise and wear and tear over time.
Conclusion
upgrading your kitchen with soft close hinges is a DIY project that can enhance both the functionality and aesthetics of your space.
By following this comprehensive guide, you can confidently transform your existing cabinets into soft close wonders.
Enjoy the elegance and convenience of softly closing cabinet doors, all without the need for a costly kitchen overhaul.
For further information and product details, consider visiting the Blum website to explore a full range of products.
Thank you for reading, and don’t forget to pin this guide for future reference. Your kitchen upgrade journey starts here!

